Floorcloths
Directions from the web on how to safely make a floorcloth.
Floorcloths
Materials:
Boiled Linseed oil
Mineral spirits Paint thinner
Japan Dryer
Corhstarch
Method:
- Make a sizing by boiling about a quart of water and adding cornstarch mixed in cold water until the mixture become syrupy
- Paint the cloth with the cornstarch sizing and let dry
- Mix one part boiled linseed oil with one part mineral spirits. Add two tblps of japan dryer per pint.
- With a brush, pain the cloth with the linseed oil mix and let dry. This can take up to two days.
- Mix one part boiled linseed oil with TWO parts mineral spirits. Add two tblps Japan dryer per pint.
Formulating an Impression
Given to those participating in the Mt Morris Time Traveling Tea.
How I develop a first person persona given basic facts available in census data and records.
Ok, so you’ve been assigned a person to portray and you have the basic facts
(age, birthday, marriage date, spouse name, occupation, siblings and parents,
children, etc) But how do you take that info and make a person come to life from
it? Well, any of you who have acting experience know this takes some thought. So
pull out a pencil and writing pad, you’re going to create a person!
Major events: all of us have experienced major events in our lives. This could
be the death of a loved one, our wedding day, or the day our first child was
born. It could also be military service or unusual circumstances such as the
time we were homeless and had to move in with our parents. Think about the
person you portray and how the sequence of their lives went. Did the deaths of
their children happen all at once? You can be sure that was tragic and tough
event to live through. The person had to be strong to get through that one.
These major events “build character” and by thinking about what it must have
been like, you can assume a few things about the character of your persona.
Personality quirks: all of us have them. It’s safe to assume that our persona’s
might have too. Even if not documented, people have certain aversions, likes,
habits (good and bad). Perhaps Dr. Myron twists the ends of his mustache when
he’s thinking. Or perhaps Elizabeth Brown is known under stairs for her bad
jokes. Or maybe Mary is a gossip. These little things bring life into a
character. Just be careful to keep it realistic and not over the top. It’s fine
to tell a few jokes. It’s NOT fine if Dr. Branch suddenly develops an allergic
reaction to butter during the course of the tea!!
Beliefs: religion played a MAJOR part in the lives of people from this time
period. I’ll be posting a few journal entries from Susan’s niece, Ellen, about
how much they did church. God was a daily part of their lives. The General laid
the groundwork for the first church, so it must have been important to them.
Interestingly, it did not matter the denomination. Ellen writes about visiting
several churches on any given sunday. It was a whole day of sermons! And it
wasn’t considered boring or annoying, but part of life. How can you work this
in? Well, memorize some scripture, be able to use religious sayings in
appropriate contexts such as “God bless you” or “God grant you safe passage” or
“I’ll pray for you” etc. Again, keep it realistic and subtle. We’re not looking
for a revival here!
Along with religion is politics. 1860 was the election year that elected
Lincoln. But there were around 4 other candidates as well. Perhaps Levi Parsons
was thinking about voting for Beckinridge. It’s worth while for those elligable
to vote (men over 18)to take a look at the 1860 election. Find out who was
currently running in 1859. Who would your persona have voted for? Incidentally,
we have nothing to tell us of the Mills’ beliefs on abolition and slavery. But
Myron lived in Rochester, home to Frederick Douglas. It is probable that he did
have an opinion on it. Remember too, that NY had abolished slavery in the state
as late as 1848 (I think?) so there might still be free blacks in the area that
people would have interacted with. Slavery in NY was NOT a distant memory.
Perhaps more concern would be about how the candidates were going to make
policies affecting native Americans. Indians had helped the General make a start
here and they could easily still be around (remember the “white woman of the
Genesee” Letchworth was a stone’s throw away!)
If your character is female, what about Temperence, Women’s rights, social
reform? Rich women were always doing something for charity. Mary Seymour would
grow up to be a prominent women’s rights activist. The seeds of that might have
been sown by her parents, or a close female relative or friend.
Speech: This is likely the hardest area to master. Consider if your character
might have had an accent (north, south, Irish) If the answer is yes, and you
don’t naturally have that accent, you should do your very best to learn that
accent from native speakers. YouTube is a good way to listen to others. Only do
the accent if you have it mastered. We don’t want any “Lucky charms” Irish
accents. And please remember that if you are transplanted from your homeland,
your accent might be wearing off over the years. Second generation might never
have had it to begin with. This one, being that it’s in our home area, we
shouldn’t have to worry about accent at all this time.
Besides accent, the hardest thing to get is to eliminate modern speech and words
for period alternatives. For instance, we don’t want to say “ok” or “yup”, we
want to say “yes” and “alright”. Don’t want to say “sweet!” or “Awesome”, you
want to say “bully!” or “How perfectly stunning!” Young ladies might “set their
cap at a boy” instead of “date” him. Words like “wonderful, splendid, oh misery,
oh my, goodness” can all substitute for some of our modern phrases. No one wants
to hear “This sucks!” in a period setting. Yes, it does require some training
and careful policing of the mouth, but practice makes perfect! And thinking
about how your character would react to a certain situation can help you to
pre-plan responses and make it that much easier to produce them in the moment.
Appearance: is likely dictated by status. Won’t get into that here.
Just as with most everything, preparation is key. Try to get into your persona’s
head, and then think about some of the situations they might encounter during
the event. Thinking now about how your character would react to certain
situations, and then pre-planning their actions and responses is the best way to
be sure that you have those responses available for recall during the actual
event. If you are serving, how would you react if a guest spilled something?
Would you wait for another servant to clean it up and thus shirk your job (which
would likely get you fired soon!) or would you clean it up right away to make a
good impression on your mistress? Are you timid, submissive, or aristocratic? If
you find someone saying nasty gossip about a close friend, how would your
character react? How does your persona deal with social situations? DO they find
them boring, or do they love the chance to chat or tell stories? Are THEY a
bore? If you have an active imagination yourself, perhaps you can make up old
war stories that you can recall for visitors. Or maybe there was the time that
you were at a barn raising and one of the walls didn’t raise.
If you are developing responses, and find that you need to know more about a
subject, take for instance the Mexican war, go and do a little research on that
war. Find out who was general then. Find out what branch your character may have
served with. Bone up on the major conflicts and how it turned out in the end.
It’s worth it and enriches your character. You can also make up stories amongst
the siblings. Say for instance that young Myron got stuck in a tree once and big
brother Sidney had to devise a way to get him down. Use this group to plan those
little things and it will make a group of people seem more like the family they
are portraying.
I can only give you the facts, it’s up to you to breathe life into your person.
This is also a case where the more you invest in planning and preparation, the
more you will get out of the event. The better prepared you are, the more
appealing and believable your persona will be.
Good luck. And if you need support, we’re right here to talk to!
Bevin
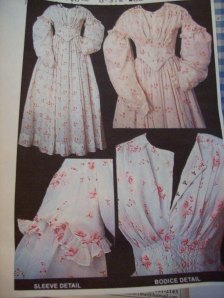
The dress is an 1840′s style fan front. The only thing I did differently was to make it a stright waist instead of a point, and to make it a V-neck:
This now places it in the 50′s. But, the problem is, I reenact the War years. So I need to bring the dress into the 60′s. We start with this:
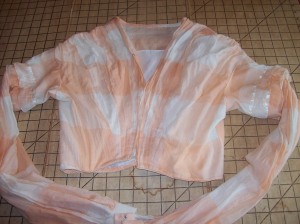
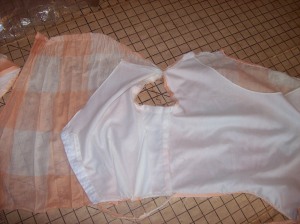
Then, we take the piping off the lower front edge, detach the sleeves, and unpick the shoulder seam. The bodice front needs to be re-cut and a different sleeve style needs to be attached. Here’s what it looks like after ripping:
Next step is to re-fit the bodice. This time, I only want a couple pleats instead of a fan front. So I resew the shoulder seam so the bodice front comes into it flat instead of gathered, and then fit the pleats over my corseted figure. Next, I reattach the piping on the lower edge of the bodice, and, until I can find a sleeve style I like better, I attach the lower sleeve of the original incarnation (a bishop) right into the armseye. This is the finished result once the bodice is re-attached to the skirt:
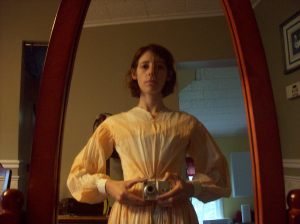
Much more 60′s style! These are the pieces I didn’t use that will be saved for future alterations (I’d like to find an open sleeve style with maybe some ruffles at the edge later)
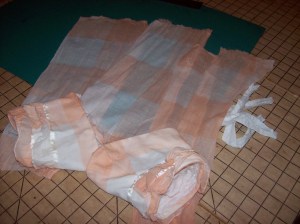
So you see, if made correctly, a period dress can be easily altered for another decade, or a larger or smaller size, just as our foremothers did!
2. Assemble the Skirt
How I develop a first person persona given basic facts available in census data and records.
Ok, so you’ve been assigned a person to portray and you have the basic facts
(age, birthday, marriage date, spouse name, occupation, siblings and parents,
children, etc) But how do you take that info and make a person come to life from
it? Well, any of you who have acting experience know this takes some thought. So
pull out a pencil and writing pad, you’re going to create a person!
Major events: all of us have experienced major events in our lives. This could
be the death of a loved one, our wedding day, or the day our first child was
born. It could also be military service or unusual circumstances such as the
time we were homeless and had to move in with our parents. Think about the
person you portray and how the sequence of their lives went. Did the deaths of
their children happen all at once? You can be sure that was tragic and tough
event to live through. The person had to be strong to get through that one.
These major events “build character” and by thinking about what it must have
been like, you can assume a few things about the character of your persona.
Personality quirks: all of us have them. It’s safe to assume that our persona’s
might have too. Even if not documented, people have certain aversions, likes,
habits (good and bad). Perhaps Dr. Myron twists the ends of his mustache when
he’s thinking. Or perhaps Elizabeth Brown is known under stairs for her bad
jokes. Or maybe Mary is a gossip. These little things bring life into a
character. Just be careful to keep it realistic and not over the top. It’s fine
to tell a few jokes. It’s NOT fine if Dr. Branch suddenly develops an allergic
reaction to butter during the course of the tea!!
Beliefs: religion played a MAJOR part in the lives of people from this time
period. I’ll be posting a few journal entries from Susan’s niece, Ellen, about
how much they did church. God was a daily part of their lives. The General laid
the groundwork for the first church, so it must have been important to them.
Interestingly, it did not matter the denomination. Ellen writes about visiting
several churches on any given sunday. It was a whole day of sermons! And it
wasn’t considered boring or annoying, but part of life. How can you work this
in? Well, memorize some scripture, be able to use religious sayings in
appropriate contexts such as “God bless you” or “God grant you safe passage” or
“I’ll pray for you” etc. Again, keep it realistic and subtle. We’re not looking
for a revival here!
Along with religion is politics. 1860 was the election year that elected
Lincoln. But there were around 4 other candidates as well. Perhaps Levi Parsons
was thinking about voting for Beckinridge. It’s worth while for those elligable
to vote (men over 18)to take a look at the 1860 election. Find out who was
currently running in 1859. Who would your persona have voted for? Incidentally,
we have nothing to tell us of the Mills’ beliefs on abolition and slavery. But
Myron lived in Rochester, home to Frederick Douglas. It is probable that he did
have an opinion on it. Remember too, that NY had abolished slavery in the state
as late as 1848 (I think?) so there might still be free blacks in the area that
people would have interacted with. Slavery in NY was NOT a distant memory.
Perhaps more concern would be about how the candidates were going to make
policies affecting native Americans. Indians had helped the General make a start
here and they could easily still be around (remember the “white woman of the
Genesee” Letchworth was a stone’s throw away!)
If your character is female, what about Temperence, Women’s rights, social
reform? Rich women were always doing something for charity. Mary Seymour would
grow up to be a prominent women’s rights activist. The seeds of that might have
been sown by her parents, or a close female relative or friend.
Speech: This is likely the hardest area to master. Consider if your character
might have had an accent (north, south, Irish) If the answer is yes, and you
don’t naturally have that accent, you should do your very best to learn that
accent from native speakers. YouTube is a good way to listen to others. Only do
the accent if you have it mastered. We don’t want any “Lucky charms” Irish
accents. And please remember that if you are transplanted from your homeland,
your accent might be wearing off over the years. Second generation might never
have had it to begin with. This one, being that it’s in our home area, we
shouldn’t have to worry about accent at all this time.
Besides accent, the hardest thing to get is to eliminate modern speech and words
for period alternatives. For instance, we don’t want to say “ok” or “yup”, we
want to say “yes” and “alright”. Don’t want to say “sweet!” or “Awesome”, you
want to say “bully!” or “How perfectly stunning!” Young ladies might “set their
cap at a boy” instead of “date” him. Words like “wonderful, splendid, oh misery,
oh my, goodness” can all substitute for some of our modern phrases. No one wants
to hear “This sucks!” in a period setting. Yes, it does require some training
and careful policing of the mouth, but practice makes perfect! And thinking
about how your character would react to a certain situation can help you to
pre-plan responses and make it that much easier to produce them in the moment.
Appearance: is likely dictated by status. Won’t get into that here.
Just as with most everything, preparation is key. Try to get into your persona’s
head, and then think about some of the situations they might encounter during
the event. Thinking now about how your character would react to certain
situations, and then pre-planning their actions and responses is the best way to
be sure that you have those responses available for recall during the actual
event. If you are serving, how would you react if a guest spilled something?
Would you wait for another servant to clean it up and thus shirk your job (which
would likely get you fired soon!) or would you clean it up right away to make a
good impression on your mistress? Are you timid, submissive, or aristocratic? If
you find someone saying nasty gossip about a close friend, how would your
character react? How does your persona deal with social situations? DO they find
them boring, or do they love the chance to chat or tell stories? Are THEY a
bore? If you have an active imagination yourself, perhaps you can make up old
war stories that you can recall for visitors. Or maybe there was the time that
you were at a barn raising and one of the walls didn’t raise.
If you are developing responses, and find that you need to know more about a
subject, take for instance the Mexican war, go and do a little research on that
war. Find out who was general then. Find out what branch your character may have
served with. Bone up on the major conflicts and how it turned out in the end.
It’s worth it and enriches your character. You can also make up stories amongst
the siblings. Say for instance that young Myron got stuck in a tree once and big
brother Sidney had to devise a way to get him down. Use this group to plan those
little things and it will make a group of people seem more like the family they
are portraying.
I can only give you the facts, it’s up to you to breathe life into your person.
This is also a case where the more you invest in planning and preparation, the
more you will get out of the event. The better prepared you are, the more
appealing and believable your persona will be.
Good luck. And if you need support, we’re right here to talk to!
Bevin
Hair Kit list
The Hair Kit
As we all know, one’s hairstyle is a big key to
our impressions. One can either look like she stepped out of a CDV, or
like she stepped out of an 80’s rock band! Whether doing it yourself, or
relying on others to do your hair, a good smattering of equipment makes
all the difference. One elastic and two pins severely limits how your
hair can be done, while a variety of implements, easily kept in a cloth
drawstring bag (you can make from a dress scrap) and thrown in the
hatbox allows for a great range of fantastic styles.
The Essentials
The Comb: a must for making the vital center part, a brush won’t work here
At least 5 elastics: preferably the color of your hair, not pink or yellow, thin, not thick like a caterpillar
Several types of pins: bobby, or V
shaped, or imitation “tortoise” shell with an extra bar in the middle.
One type of pin does not suit all purposes.
Hair oil: a natural oil, such as almond, gives shine and controls frizz the period way
Pomade: a natural sticky stuff that
you can put on the ends of layered hair to prevent them from sticking
out, a little dab will do
Sunscreen: unscented baby kind to
protect that part and any exposed hair from sun damage (they didn’t have
it, but then, they didn’t know about the dangers of skin cancer!)
Great Extras
Brush: if you must!
Rats: no, not the rodent, these are
wads of your own hair that add fullness to the sides for a desirable
face-framing poof. Highly recommended for those who have shoulder-length
hair or thinning hair
Switch: otherwise known as “fake hair”, a long braid or coiled bun for the less endowed in the tresses department
Invisible hairnet: made of human hair, or a material very similar, keeps fly-a-ways neat
Hairnet: decorative with a function, has ribbons along the top, the net imitates silk and keeps hair neat
Caps, confections, decorations: for the ball, or to hide the bad hair day, worn also by women with thinning hair
Wig: if you have no hair, you may consider this option
Many
of these aids can be found at Sally’s Beauty supply, or your local
grocery or drugstore, or can be made yourself. Hairspray, gel and mousse
are not necessary, nor are they period correct, and can often leave
your hair in a less-than-healthy state at the end of the weekend.
Assemble your hair kit and feel prepared! ~Miss MacRae
How to remake a dress like THEY did!
I have, in my collection of dresses, a lovely sheer based on this dress:
The dress is an 1840′s style fan front. The only thing I did differently was to make it a stright waist instead of a point, and to make it a V-neck:

This now places it in the 50′s. But, the problem is, I reenact the War years. So I need to bring the dress into the 60′s. We start with this:

Then, we take the piping off the lower front edge, detach the sleeves, and unpick the shoulder seam. The bodice front needs to be re-cut and a different sleeve style needs to be attached. Here’s what it looks like after ripping:

Next step is to re-fit the bodice. This time, I only want a couple pleats instead of a fan front. So I resew the shoulder seam so the bodice front comes into it flat instead of gathered, and then fit the pleats over my corseted figure. Next, I reattach the piping on the lower edge of the bodice, and, until I can find a sleeve style I like better, I attach the lower sleeve of the original incarnation (a bishop) right into the armseye. This is the finished result once the bodice is re-attached to the skirt:

Much more 60′s style! These are the pieces I didn’t use that will be saved for future alterations (I’d like to find an open sleeve style with maybe some ruffles at the edge later)

So you see, if made correctly, a period dress can be easily altered for another decade, or a larger or smaller size, just as our foremothers did!
How-to for your infant
I’m not a mother, nor do I ever intend to become one, but the recent
burst of newborns in my unit had me thinking about infant clothes. Well,
not so much thinking about them as making them. Guess what: very FUN to
make!! Anyway, I took some pictures along the way, so maybe you young
mothers out there who need to cloth infants for events can follow along
and make up a few things for your little one.
I’ll also say, I’m no expert in children’s clothing! Please visit the Sewing Academy. Elizabeth Stuart Clark has a just wonderful line of infant and children’s patterns and all the tech support to go with it. This is very basic, not thorough, but just enough to get you started!
First off, what to wear underneath. It’s recommended that your little one wear something to protect hs/her clothing from his or herself, so white undies in many sets are made.
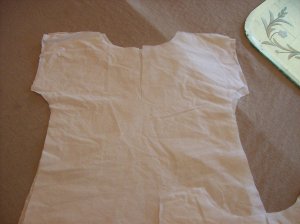
Above we have the chemise or shift. I’ve opted to do the sleeves as one, but you could also do them set-in like and adult chemise. All that is left is to sew the side seams, finish the neckline and sleeve openings with a small rolled hem, and put a finished slit down the back for getting into. Fasten with hook and eye, or button securely sewn on. Make sure it’s a glass button that can be washed many times. You’ll need many of these as they get wet often… For added comfort, you can flat-fell the seams to make it comfy for baby.
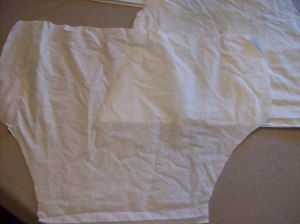
Beside it is one half of the drawers for a little one.This makes one leg when the curved seam is sewn together. Now, split drawers were more common during the day for ease of getting to the nappy, but closed are best to hide the modern diaper. I didn’t think to worry about a difference between front or back as children are pretty round at this point. Do be sure to make the crotch depth deep and the leg length shallow. Once you have the two legs sewn into tubes, simply sew around the crotch seam to attach them. You can make a casing by folding down the top edge a couple times and then run elastic at a comfortable length. Not PC, but easier than a fitted waistband.
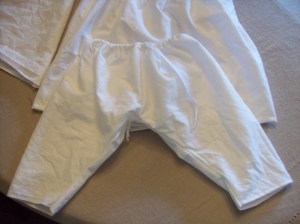 Here they are finished.
Something also worn underneath when your baby starts to crawl and toddle, is a nice full petticoat or two! Made just like the adult petticoat. Make it long and tuck it up for walking in so it will grow with her. The only problem is how to keep it on that egg-shaped body. The trick is to use buttons either on the chemise or on an undershirt that correspond to buttonholes in the waistband of the petticoat. This also works well with a set of tiny corded stays. It’s, in the words of ESC a “stable button platform” to attach the petticoat onto.Now, lest you be making every chemise with 6 buttons on it (glass buttons, of course, secured well for washing!) the great thing about the stays is that, since they are worn over the chemise, they don’t have to be washed as often and so can be worn everyday. One set of buttons that way. And only double that amount of button holes (assuming you have two petticoats!) so it’s not that bad! You can also make the petticoat and undershirt permanently attached and make a few of those if you hate buttonholes.

Now, onto the dress. And yes, boys wore dresses. At least, until they were toilet-trained. At that point, they started to wear little breeches under the shortened dresses which then became tunics. Their trimmings also varied, but both sexs started out wearing the same long gown.
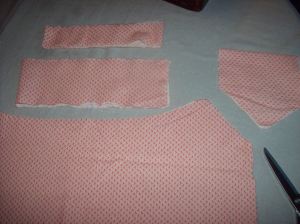 We start with our adult chemise pattern shapes (FREE pattern on the
Sewing Academy website!) and just scale them down for baby. You can see
the body of the dress is a rectangle with a curved neckline cut out of
the top. Slight slope, nothing too deep. The sleeves folded in half as
they will be worn attach to the diagonal seam on the body. The two
rectangles are the neckband on the top and the belt on the bottom. The
belt is optional. You could also opt to set the belt into the dress for a
cuter and more finished look.
You’ll notice we’re using a red/pink fabric. Back then, colors indicating sex hadn’t been established yet, so don’t be afraid to dress a girl in blue or red or a boy in pinks!
The length I’ve chosen is about 30 inches. The infant gown is long, and when they begin crawling, it gets shortened with tucks to allow freer movement.
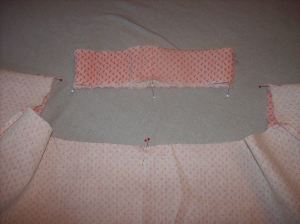 Start
by attaching the sleeves to the diagonal seams on the body and then do
the side seams and close the sleeves with the same long seam under the
arm. Next is gathering the neckline into the band. You can measure your
baby’s neckline with a piece of string draped around the shoulders. Find
the length there and cut your fabric accordingly. Be sure to leave
enough for a back seam or opening.

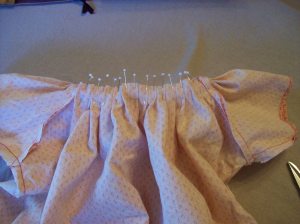
To gather the neckline into the neckband, mark the center front, center back, and top of each shoulder of the dress with pins. Match those up to quarter points on the neckband. You can either hand-gather the body to fit, or pleat as i prefer to. It’s a nice touch to have the gathers fullest in the center back and front and less full right between the sleeve and body pieces. The sleeves can be moderately full.
Stitch and then tun down the neckband twice and whip stitch shut, encasing the raw edges of the body.
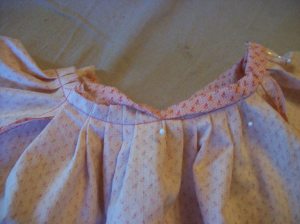
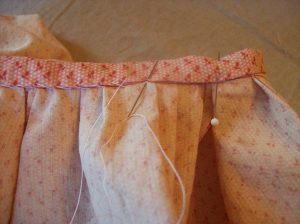
In this case, the neckband is a complete circle and is large enough to slip over the baby’s head, but if you want a more closed neckline, you’ll need to make a center back opening that closes with hooks and eyes, ties, or buttons and holes. In the day, mothers also used straight pins to secure things, but that’s not safe!
To complete the belt, simply fold in half, stitch down one side. Turn the tube right-side out, finish the ends, add a button and button hole or hooks and eyes.
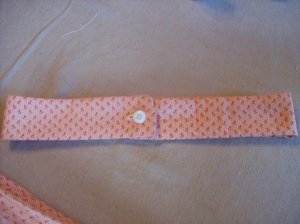
You’ll want to secure the belt to the dress with a few light tacks at the waist.

Now, you’ll want to protect that dress as much as possible, so cut a pinafore!
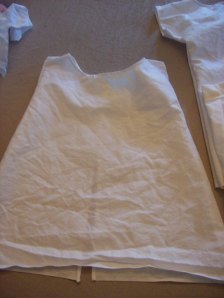 It’s
like a sleeveless version of the chemise above and opens all the way
down the back. You simply fasten it at the top. It’s like a bib, so make
many of these as well. You can also use a sleeveless version of the
dress pattern that is gathered and full and The Sewing Academy has a
free pinafore article for even more versions available.
Happy sewing, new mothers!
I’ll also say, I’m no expert in children’s clothing! Please visit the Sewing Academy. Elizabeth Stuart Clark has a just wonderful line of infant and children’s patterns and all the tech support to go with it. This is very basic, not thorough, but just enough to get you started!
First off, what to wear underneath. It’s recommended that your little one wear something to protect hs/her clothing from his or herself, so white undies in many sets are made.


Above we have the chemise or shift. I’ve opted to do the sleeves as one, but you could also do them set-in like and adult chemise. All that is left is to sew the side seams, finish the neckline and sleeve openings with a small rolled hem, and put a finished slit down the back for getting into. Fasten with hook and eye, or button securely sewn on. Make sure it’s a glass button that can be washed many times. You’ll need many of these as they get wet often… For added comfort, you can flat-fell the seams to make it comfy for baby.
Beside it is one half of the drawers for a little one.This makes one leg when the curved seam is sewn together. Now, split drawers were more common during the day for ease of getting to the nappy, but closed are best to hide the modern diaper. I didn’t think to worry about a difference between front or back as children are pretty round at this point. Do be sure to make the crotch depth deep and the leg length shallow. Once you have the two legs sewn into tubes, simply sew around the crotch seam to attach them. You can make a casing by folding down the top edge a couple times and then run elastic at a comfortable length. Not PC, but easier than a fitted waistband.
 Here they are finished.
Something also worn underneath when your baby starts to crawl and toddle, is a nice full petticoat or two! Made just like the adult petticoat. Make it long and tuck it up for walking in so it will grow with her. The only problem is how to keep it on that egg-shaped body. The trick is to use buttons either on the chemise or on an undershirt that correspond to buttonholes in the waistband of the petticoat. This also works well with a set of tiny corded stays. It’s, in the words of ESC a “stable button platform” to attach the petticoat onto.Now, lest you be making every chemise with 6 buttons on it (glass buttons, of course, secured well for washing!) the great thing about the stays is that, since they are worn over the chemise, they don’t have to be washed as often and so can be worn everyday. One set of buttons that way. And only double that amount of button holes (assuming you have two petticoats!) so it’s not that bad! You can also make the petticoat and undershirt permanently attached and make a few of those if you hate buttonholes.

Now, onto the dress. And yes, boys wore dresses. At least, until they were toilet-trained. At that point, they started to wear little breeches under the shortened dresses which then became tunics. Their trimmings also varied, but both sexs started out wearing the same long gown.
 We start with our adult chemise pattern shapes (FREE pattern on the
Sewing Academy website!) and just scale them down for baby. You can see
the body of the dress is a rectangle with a curved neckline cut out of
the top. Slight slope, nothing too deep. The sleeves folded in half as
they will be worn attach to the diagonal seam on the body. The two
rectangles are the neckband on the top and the belt on the bottom. The
belt is optional. You could also opt to set the belt into the dress for a
cuter and more finished look.
We start with our adult chemise pattern shapes (FREE pattern on the
Sewing Academy website!) and just scale them down for baby. You can see
the body of the dress is a rectangle with a curved neckline cut out of
the top. Slight slope, nothing too deep. The sleeves folded in half as
they will be worn attach to the diagonal seam on the body. The two
rectangles are the neckband on the top and the belt on the bottom. The
belt is optional. You could also opt to set the belt into the dress for a
cuter and more finished look.You’ll notice we’re using a red/pink fabric. Back then, colors indicating sex hadn’t been established yet, so don’t be afraid to dress a girl in blue or red or a boy in pinks!
The length I’ve chosen is about 30 inches. The infant gown is long, and when they begin crawling, it gets shortened with tucks to allow freer movement.
 Start
by attaching the sleeves to the diagonal seams on the body and then do
the side seams and close the sleeves with the same long seam under the
arm. Next is gathering the neckline into the band. You can measure your
baby’s neckline with a piece of string draped around the shoulders. Find
the length there and cut your fabric accordingly. Be sure to leave
enough for a back seam or opening.

To gather the neckline into the neckband, mark the center front, center back, and top of each shoulder of the dress with pins. Match those up to quarter points on the neckband. You can either hand-gather the body to fit, or pleat as i prefer to. It’s a nice touch to have the gathers fullest in the center back and front and less full right between the sleeve and body pieces. The sleeves can be moderately full.
Stitch and then tun down the neckband twice and whip stitch shut, encasing the raw edges of the body.


In this case, the neckband is a complete circle and is large enough to slip over the baby’s head, but if you want a more closed neckline, you’ll need to make a center back opening that closes with hooks and eyes, ties, or buttons and holes. In the day, mothers also used straight pins to secure things, but that’s not safe!
To complete the belt, simply fold in half, stitch down one side. Turn the tube right-side out, finish the ends, add a button and button hole or hooks and eyes.

You’ll want to secure the belt to the dress with a few light tacks at the waist.

Now, you’ll want to protect that dress as much as possible, so cut a pinafore!
 It’s
like a sleeveless version of the chemise above and opens all the way
down the back. You simply fasten it at the top. It’s like a bib, so make
many of these as well. You can also use a sleeveless version of the
dress pattern that is gathered and full and The Sewing Academy has a
free pinafore article for even more versions available.
It’s
like a sleeveless version of the chemise above and opens all the way
down the back. You simply fasten it at the top. It’s like a bib, so make
many of these as well. You can also use a sleeveless version of the
dress pattern that is gathered and full and The Sewing Academy has a
free pinafore article for even more versions available.Happy sewing, new mothers!
Making Cages
Winter 2008 Cage workshop
Cage instructions:
Define its purpose: Working cage
that is small and easy to move in but keeps a nice silhouette and the
skirts away from your legs? Fancy and full for balls? For everyday? A
young lady whose skirts are shorter? Put the answer here:
__________________________________________________________________
The size: Depending on the
purpose you want the cage to fulfill, the cage may be large (up to 120”
circumference at the bottom) or small (70” to 80”) You can also use a
formula to figure out the circumference of the bottom hoop: 50% of your
total height = the diameter of the hoop. Use Pi D to find the
circumference.
Height______
50% of height_______
C = Pi D
The shape: First cages were
perfectly round, but by the war years, hoops had a decided back thrust.
The majority of their volume was at the back. The front was beginning to
flatten out and move towards an elliptical shape. When cutting your
hoops, make the bottom one the largest circumference and use your eye to
find the smaller rungs. The uppermost one or two may be incomplete,
that is, they may not be a full circle. This allows you to get in and
out of your cage easily.
How many “bones”: A small or
shorter hoop, such as for working or for a young lady, will need fewer
bones than a larger hoop. However, to increase strength of the cage,
closer together, and therefore more numerous hoops, are helpful. Start
with four or five and add more as needed.
Length: Cages should be no
closer to the ground than mid-calf. Many actually prefer it higher,
closer to the knee. If you choose higher, you may be able to get away
with a smaller cage circumference and supplement volume with petticoats
instead of bigger hoops. The first bone should be around 6” down from
your waistband.
To roll or not to roll: To
achieve the back thrust, you may find you need a bumroll, or hip roll,
to force the back part of the cage away from your waist. Experiment with
different sizes and shapes. It should look like a “C” that goes around
your hips and ties in the front. You can also adjust the amount of back
thrust by tying the roll higher or lower on your body.
Just another WordPress.com weblog
Order of Dress Construction
How to construct a dress in the least amount of time.
Order of dress construction
- Rip out the skirt panels. There should be at least three. Each panel is to be 44 inches long. Measure out the 4th panel and make sure you will have enough fabric for the bodice and sleeves before ripping it out
Rip a waistband
Cut the bodice lining and bodice
Cut the sleeves
Cut a pocket from the scraps
Cut and piece piping strips from the scraps
Cut any other pieces needed (sleeve jockeys, cuffs, trims)
Assemble the skirt panels starting from the hem up. This ensures all the hem edge is even. The top will be folded down
Make sure to remember the pocket! And don’t forget the left opening. You should have a tube when finished
Rip out the hem facing and assemble into a strip.
Press every seam
Sew hem facing strip onto bottom of dress
Press it up and pin with safety pins
Use uneven running stitch and matching hand-sewing thread to sew up hem facing
3.Bodice Assembly
Press back bodice lining flat
Press back of bodice
Lay bodice on top of back lining, pin a few times
Draw with chalk the curved seam, fold the fabric and beat to transfer chalk to other side. Open and redraw both lines.
Stitch along lines. Press seams over the lines (dress fabric only)
Hand stitch the false seam with small running stitches and hand-sewing thread
Attach bodice fronts (and linings) at side and shoulder seams. Press all seams back
4.Finish bodice
Sew front edges back with a whip stitch
Place hooks and eyes
Fit darts and stitch them down
If external
waistband, add that making sure to overlap to the left and that the
waistband is placed higher than the edge of the bodice length.
Fold waistband up and stitch. Add hooks and eyes to that.
Make piping and attach. Hand-sew piping at neckline. If internal waistband, attach and sew piping at bottom bodice edge.
Assemble and attach sleeves
Finish wrist edge of sleeves (cuff, folded and whipped, piping
5.Finish and Attach Skirt
Balance skirt by placing right sides together, pinning the bottom edges even, and laying out full length.
Mark center front, center back, and sides with vertical pins. Use horizontal pins to fold down skirt to length.
Press top edge.
If internal
waistband, attach skirt to that. If external, attach skirt directly to
bodice. Match up center front and back and sides. Use a whip stitch and
button thread or waxed hand-sewing thread to attach to waistband. Make
whip stitches very fine and secure. Knot every so often. Gauge with two
button threads and long needles.
Use “Divide and Conquer” for pleats, for gauging attach as you gauge the four sections of the skirt.
Keep in mind that
larger waist sizes your gauging stitches need to be smaller and pleats
finer. Small waist sizes equal larger gauging stitches and deeper
pleats.
Soldier impression help for Women
Taking the field in disguise? Here’s how to do it right!
My Rifle on My Shoulder or Going for a Soldier
A guide for females
If you are a woman seeking to portray a
soldier, your job will be doubly difficult. You must learn the manual of
arms, how to drill in formation, and the care and feeding of your
weapon, but you must also be a master of disguise, a secret agent for
your sex! If you are detected, you risk being forced into skirts, and,
worse yet, you endanger the standing of the unit in the eyes of its
Battalion and yourself in the opinions of your fellow men folk. If you
are successful, you will gain a new understanding of the daily life of a
soldier and a newfound respect for the sacrifices they made on distant
battlefields. However, not every woman will be a successful soldier.
Make no mistake; taking on this challenging role requires careful study,
much preparation, and rehearsed responses. Just as an actor gets in the
head of his character, so must you enter the world of men.
Appearances
The mirror is your friend
Disguising your feminine physical features is a
big element in being a successful soldier. If you can succeed at this,
you will have surpassed the biggest hurdle to becoming a man. However,
some women are going to look like women no matter what is done (outside
of major surgery!) To you, I say, perhaps this is not for you! You will
feel more comfortable as a lady than constantly worrying about your
detection as a man.
Let’s start from the top down!
The face and head is
the most tell-tale place to recognize feminine features. Women with long
hair have great trouble hiding it, and a beautiful face easily draws
unwanted attention. A good hat is a starting point for disguise. Avoid
wide-brimmed styles that frame a face, such as a slouch hat. Rather, go
for a Kepi, or forage cap. You can pull the brim low on your brow and
the forage cap has an expanding top for hiding hair in. These hats also
come down fairly low in the back.
Cutting the hair short is
the best thing, but not for everybody, especially if you are just
trying this type of experience out. If you do cut it, be sure to think
about a versatile cut that can imitate the men’s “hat hair” from this
period. It is longer than guys wear today. Look at CDVs for inspiration
and consider pomade, as it was a frequent style aid of the time.
Hiding hair that is long
is challenging. If you are blessed with masculine looking wisps at the
nape of your neck, you can easily put up the bulk of your hair under
your cap and leave these to look like the fashionable styles of the men.
If you don’t have those, putting all your hair up under the hat only
screams “woman” to the troops. Some experiment will have to be done at
home to arrange the hair in a boyish bowl cut, a messy bob, or some
variation. A wig can be employed, but do remember how hot it gets out
there. Sometimes a fall (known as a hair weave to the AA community) of
human hair can be dyed to match and then sewn on the band of the hat.
The fall is then trimmed to look like bangs, sideburns, and messy shag
in the back. This is a most convincing option but requires the services
of a willing hairdresser who has preferably worked for the theatre
community. Do not put your hair in a pony-tail or braid down the back!
That style went out with the Revolution and only increases your feminine
looks! Men of this period, especially in the military, tended towards
shorter hair as a preventative of lice and other itchy vermin.
The face is another area where femininity is difficult to hide. Do not pluck your eye-brows if you hope to have a chance here! A
bushy brow is an excellent way to look more mannish. If you are very
fair, get dirty. Most soldiers mucked about in filth as part of the job
and had few opportunities to wash. A few well-placed dirt splotches can
hide the snowy complexion. Eyebrow pencil can also be used to discreetly
suggest a 5 o’clock shadow. Outlining the jaw bone in particular can
make one look more angular. Please practice this one at home until it
looks convincing. Nothing looks worse than a woman with a scrolled
French pencil mustache!
If you long for the real
thing, drag kings suggest acquiring crepe wool used for doll hair in a
similar shade to your own. Cut it up very fine with sharp scissors. Use
spirit glue on the area of your face you wish to cover. Wait until the
glue is tacky and then dust the area with the wool on a large make-up
brush to imitate stubble. Again, I would try this one out at home as it
can be very tricky to duplicate in the field. It was also a method that
was unavailable to our ancestors attempting to pass as male. If you are
too old to get away with peach fuzz, invest in a quality facial
hairpiece from a theatre supply company. Test it out at home to make
sure it will stay on and that you can get used to it!
Next we have the neck.
Some ladies are blessed with an Adam’s apple. If not, a high neckstock,
or cravat, can hide that fact and make you out for a cultured gentleman
as opposed to the lower class of men in the ranks. A handkerchief tied
about the neck is also viable and can be soaked in cool water on hot
days for comfort.
For hiding chest features
decidedly female, a binder is the best way to go. Sports bras may
flatten you, but not to the satisfaction of trying to pass as male. Ace
bandages wrapped around the torso do the job, but can often shift during
activity. You can easily make your own binder by wrapping a sturdy
piece of cotton around your torso tightly. Secure with hooks and eyes
and add shoulder straps to keep it in place. Make sure you can breathe
in it! (Of course, those of us better endowed in this area may find no
convincing way to hide what is God-given, and may as well refrain from
going a-field. But you never know until you try!) A proper binder is not
only period, it protects your modesty should a marauding field surgeon
attempt some sort of chest operation on you as you play dead. He will
see the binder and, if he’s smart, leave you alone. If he’s not
intelligent enough to figure out what you are wearing, and more
importantly why you are wearing it, you can “revive” and scare him off, or at least convince him you are not a willing patient.
Next out from the binder,
a shirt that is cut in the usual style will do nicely. A vest, looser
fitting so as not to outline your new “pecks”, is the proper thing to
wear to further disguise your torso. The vest should reach below the
waist into the upper hip region so as not to draw attention to your
waist. Actually, the shirt was considered underwear by most Victorian
sensibilities and vulgar indeed was the man who went about without a
vest covering his unmentionables! You are only being proper by wearing
one. An additional thing that can be done with the vest is to add cotton
padding (quilt batting, do make sure it’s cotton!) around the waist
area to fill in a narrow waist. It also aids those with larger chests
making the waist the same size as the bound chest.
The shoulders pose a
dilemma that is easily overcome. Use shoulder pads tacked in your
uniform to give the illusion of broad shoulders. The uniform itself
should be larger than your normal size and should fit loosely down to
the hips with little or no shaping. Forget that wasp-waisted officer
look! How many of those do you actually see out there anyway? Experiment
with types of jackets to find which hides your hips the best. If you
are pear-shaped, try a frock coat, if you are a stick, try a shell
jacket. If you have an hourglass figure, what are you doing in
the ranks! Just kidding, try a sack coat. Make sure your sleeves are a
bit long at the cuff and exaggerated at the elbow to avoid outlining the
arm. Long sleeves can hide your smaller hands and, during action, can
easily be rolled up out of the way. They can also be used as “gloves” to
grip a hot barrel.
Pants, according to the
style of the times, should be very loose. You don’t need to stuff, or
otherwise add a “package”, just make sure there is enough bagging in the
crotch to suggest that there is. Be sure to look at the backside, too.
Too often the front looks ok while the back shows a firm bum that is
decidedly un-male! If you can do without suspenders, I highly recommend
it for utilizing the privy. If you need them, practice with them at home
under the vest until you can quickly button and unbutton without
problems. The pants should fall to touch the arches of your shoes and
fold a little there. You don’t want to trip, but you also don’t want to
expose dainty ankles.
Footwear should be the
same as any other enlisted man. If you have small feet, try one size
larger (you must be able to walk in them, however) and try using bulky
socks to take up the excess room. If you have large feet, so much the
better!
To conclude the visual
portion, the more practice you do in front of the mirror at home, the
more comfortable you can feel out there in the field. Look at all
angles. Ask yourself if you are convincing to the public, to your fellow
men. Converse to what some officers say, you cannot just jump in the
ranks. It takes practice and many dry runs at home. If a group of local
ladies wish to do this, organize a military training day where you can
evaluate your impressions and keep up on the drill.
Actions
Walk like a man
In order to succeed
as a male, you cannot act feminine. You must observe closely the daily
interactions of your fellow men. How do they walk? How do they gesture
during conversation? How do they grab the coffee pot? How do they sit?
Stand? It has been said that the best soldier women during the civil war
were nothing more than good observers of the men around them. If you
hope to pass, you must not only look male, you must act male as well.
This is most crucial outside of ranks when each man becomes an
individual again.
The walk is vital.
How else do you hope to get anywhere? You are, after all, a foot
soldier! It helps to think about the differences in the way men and
women walk. When a woman walks, she moves her hips back and forth with
every step. This is what men find so alluring, as when a man walks, he
cannot move his hips. It is as if they are fixed. I am sure you have all
seen celebrity males trying to do Latin dances on TV, with miserable
results. The only way for a man to move his legs freely without
swiveling those hips is for him to bounce up and down with the swing of
his leg. Noticing this, try to keep your torso and hips as one piece
when you imitate the man-walk. When you try walking like this, you will
notice that you must bounce to swing the next leg forward, causing your
head to go up and down as you walk. Now, men have perfected many
variations on this kind of walk, they can strut, they can add a sort of
limp-hop thing (some people find this sexy, I kid you not) they can take
long, lanky strides, or more “cultured” dignified steps. Then there is
marching and the glide step, ways of group locomotion. Once in the
ranks, you don’t need to worry about the way you walk, just maintain
shoulder contact to the men next to you and move with them. You may have
to lengthen your stride to do so if you are much smaller than they. On
your own, however, when going to sutlers, privy, etc, that is when you
would utilize your new walk. Practice this in the company of trusted men
and women until it becomes natural and unexaggerated.
Stance. Men stand
differently. This is an easy thing to imitate as no motion is involved.
Often with slumped backs and hunched shoulders, this works to your
advantage as it helps hide the front of the chest. Notice how they place
their hands. If you have dainty ones, endeavor to hide them as much as
possible. You must not gesture with them; hide them in your pockets,
behind your back. Putting hands on hips is a very feminizing gesture,
often a negative one for the male. Please avoid it! Notice the foot
placement when standing. They are usually far apart, perhaps one leg is
bent while the other straight.
Sitting. Men often try to
take up as much space as possible when sitting, while women try to take
up as little space. Thus, the world works. Often with legs spread wide,
the man sits and leans forward instead of back, placing his forearms on
his thighs. He may cross legs, but not as women do. He places his ankle
on his thigh. If you have nice legs, refrain from crossing them at the
knee, as this only shows the curves to an advantage. Crossing at the
ankles is also a decidedly female contrivance, meant to seem unassuming
and passive. Men also like to cross their arms and lean back, rarely
sitting up straight.
Often at events, men sit
on the ground. Observe this. Women seem more flexible, yet, they do not
sit in repose as easily as men do. Men lay on their sides, one knee
bent, the other straight. Their elbow props them up while their other
arm rests on the bent knee. Men don’t usually kneel on the knees, which
is why a woman being proposed to knows what’s going on the instant a man
takes that position. They often sit “Indian style”.
Grabbing things. When a
woman takes hold of an object, she often slides her hand gently on it,
feeling it first with her finger tips. A man grabs with his palm. Since
you will be gripping that rifle a few times, this is good to know.
Forget all notions of graceful movement, fluent motion, or efficient
action, men execute jerky, sudden, rapid, and short maneuvers designed
to get the job done. It may not be pretty, but it works. (This could be a
reason most men do not understand or like dancing. It’s too “pretty”,
and doesn’t really serve much of a purpose.)
The handshake. Become
familiar with and proficient at the methods that men use to greet each
other. A firm, but not aggressive handshake reinforces the male persona.
If at all possible, avoid moisturizer on your hands as well. Executing
the male hug is also a good thing to know how to do. The hips will be as
far away from the other male as possible while the hug, instead of
being planted square on, may be off to the side, especially in
situations of carrying equipment. It is often brief and consists of a
squeeze and a pat on the back. You want to be sure your binder is doing
its job for this one!
Eye contact. Men often
acknowledge one another by a slight tilt of the head while maintaining
eye contact. This is most often seen as men pass each other while on the
march, or just walking around. Men also do this when conversing. If you
don’t meet the gaze of your peer, you may be seen as disrespectful, or
extremely timid (read: “wimpy weeny-boy”). Learn not to shy away from
eye contact. Men make eye contact regularly. Hey, if they aren’t looking
at your eyes, what could they be looking at? Don’t give them the chance!
The manual of arms. You
should endeavor to learn this as thoroughly as possible to become a good
soldier. To the man of history, learning this was essential to his
survival on the field and extremely important. You should be the best
you can be at drill, loading and firing, cleaning and caring for your
equipment, and the absolute picture of military deportment and
perfection. Just as the men around you seek these things, you must seek
them as well. Let no one say you did not know what you were doing out
there! Not only is it a real danger, it holds back the entire unit. The
chain is only as strong as its weakest link, and that had better not be
you!
Talking
Man of few words
This is a difficult,
but a necessary trait to have command of. Most of us need major help in
this area. Besides smoking for a lifetime, (which I don’t recommend) a
good way to deepen the voice is to practice using less air support when
speaking. Less air going through the vocal chords produces a lower
sound. More air moving faster produces a higher sound. Every woman does
have a lower voice range they can tap into to sound male. For me, I
often find it after a weekend of reenacting when I’m tired. I get lazy,
breathe less, and therefore, speak lower. Again, you will have to do
some practice to find what works. If you are having a great deal of
trouble with this, it is advisable that you try not to speak at all. You
really shouldn’t speak anyway when on the field, and off the field, you
can be the shy, quiet gentleman.
The one time you will
have to speak is when counting off in ranks. This is a toughie, as you
are supposed to be not only low, but loud. As I mentioned, when air
moves faster through vocal chords, as when you try to be loud, it tends
to be a higher pitch. There is nothing more telling than hearing a group
of men count off, and at the very last rank (the short people) hearing a
high squeak! You must practice this one at home! Be sure you are loud
and low, but not obviously faking. Use your stomach muscles to provide
support rather than simply grunting. You only have to sustain the
correct pitch and volume for one syllable, so with some practice, it can
be done. If you can find a voice teacher, they may be able to help you
with this.
Rehearsing pre-meditated
responses to questions is also a wise idea. What will you say if an
observant spectator says “I didn’t know women fought in the war”?
Thinking of what to say in various situations and committing them to
memory can be crucial to maintaining your maleness. What will you say if
a lady asks a favor? What if your pards joke with you? What if a lady
flirts with you? Let your guard down, and you may slip into female
tendencies. Think about it beforehand, and you stand a better chance of
responding appropriately.
Expression is another
area to refine. Men seldom smile wide like women do, and their eyes are
smaller than a female’s, so squinting a lot (you will do this naturally
on sunny days anyway) and not smiling at every joke will go a long way
in making you seem like a tough guy. Avoid brushing hair out of the face
or tossing it. Historically, two women soldiers were revealed when they
held out their non-existent aprons to catch apples that were thrown at
them. The female instinct to grab at the long-worn apron gave them up in
an instant and they were drummed out of camp. If you are a girly girl,
attempt to avoid any actions which can indicate this. Your powers of
observation are your best aids here.
Duties
Don’t be a shirker!
If
you are asked to do something by a superior officer, or a lady, or
anyone “above” you, do it. Do not question, do not dawdle or drag your
feet. Above all, do not use the excuse of “I am a woman, I shouldn’t
have to do that.” You’ve just kicked yourself out of the game at that
point. To be “all you can be” you must be an eager and willing soldier.
Go on picket duty, wash the dishes, haul wood or water. No one said this
job was easy. If you want to get a real taste for it, you must do
everything that the rest of the guys are doing. If you shirk, you will
give a bad name to all other females in uniform. Try to be the best
soldier you can be, and you will gain admiration.
Training
Macho, Macho Man
If you have up to
this point been a couch potato, you will most definitely want to do some
sort of cardio and strength training months prior to your soldiering
experience. Run, take dance classes, kick box, lift weights especially
with your arms. You don’t want to be the guy who’s the last one up the
hill, and you certainly don’t want someone to have to carry you! If you
have a spouse, you can train together and spend the time bonding as well
as getting fit. I need not explain the advantages of regular exercise
in any lifestyle, but if you want to be a soldier, it is essential. You
will be carrying at least 20 pounds of extra weight in gear, and you
don’t want to let it slow you down, no matter how hot the weather is.
Miscellanea
“Taps”. I don’t really
know the right solution to this dilemma. Should a woman in uniform
remove her hat when “Taps” is played? If she is trying to be a man,
common sense would dictate “yes”, but, as removing the hat can reveal
her true sex and prove distracting to spectators, some opinions may be
“no”. Keeping the hat on while being reverent of the moment seems a
fitting tribute to me. I also feel that a bareheaded woman does much
more to distract the spectators from observing the solemnity of the
moment than the occasional hat-ed guy. However, most military men feel
that the most important thing in this situation is the reverence and
respect due the fallen during “Taps”. The cap must be removed
to pay fitting tribute, no exceptions! The easy solution is to be
certain you are dead before “Taps” is played, thus avoiding the
situation. If you cannot manage to do this, and are unsure what to do,
consult your sergeant.
Hats. Being the primary
disguise, keeping your hat on at all times, on and off the field, is
crucial to maintaining the male persona. Only in cases of medical
emergency, or if “Taps” is playing, should you remove your hat. If you
are ordered to uncover during drill, do so if no spectators are looking,
but I would otherwise refrain. If your commanding officer might have a
problem with this, you can apprise him beforehand and ask permission to
disobey that order. Be sure to drink plenty of water in order to be
safe. If you do feel as though you are suffering from the heat, tell
your file partner you don’t feel well, take a knee, drink some water,
remove your hat if you must, and don’t make a big fuss. The last thing
you want to do is draw attention to yourself.
Obviously,
if you are really in a medical emergency, you DO want attention, and
quickly. It is therefore necessary to have informed a man in your ranks
that you are a woman so that, in cases of needing medical personnel, the
man can apprise the caregivers of your sex before it is accidentally
revealed to the whole battlefield. You should also keep a medical sheet
on you at all times in an easy to reach space specifically for this
purpose.
If in cold weather, you
have a better chance to disguise yourself through the use of winter
hats, scarves, and gloves. For summer, bandanas were not worn around the
head at this time period, but you may consider the use of a Havelock
for early war battles.
Male persona. You should
pick a suitable name for yourself. If you have a family member already
in ranks with you, you may wish to also pick a different last name. Do
be consistent. Don’t force the sergeant to remember a new name each
week. Only respond to that name and be sure it is used often. It also
helps to be sure it is known throughout the unit.
One of the
best impressions for a woman soldier, especially a younger woman, is to
pass as a young boy, not yet finished puberty. He may occasionally have a
high or changing voice, his face is smooth, often he is slight of build
and he may have shaggy longish hair and other “feminine”
characteristics. He is also apt to be shy around the men, though he
imitates them very well. He may not speak often. He may “play” more, he
may be scared, and he would hang out with other kids his age in the
ranks. Think back to when you, or your sons, were that age and try to
“re-live”!
Pick a past for your man
and also a suitable reason as to why you, a woman, would want to
disguise herself as a member of the opposite sex and then face death in a
war. Doing a little research can aid you here. Some women did live as
men before the war even started. They could earn a better living earning
male wages than as a female domestic worker. Very many went to war to
follow a spouse, lover, or family member. Others did it because the pay
was attractive. Still others served for love of country. It helps to do a
bit of research into this area to better educate the public that may
ask such questions of you.
As a
soldier, your fellow pards may ask what type of work you did before
enlisting. They notice your sewing skills-perhaps you were a tailor.
They notice your rapport with horses, perhaps you were a teamster. If
you cook well, perhaps you were a cook for the local establishment back
home. Keep in mind, too, that at this time period, most nurses were men.
The dawn of the female nurse was just beginning during the Civil War.
Serving as men, many female soldiers appear to have volunteered for
nursing duty.
The unit greatly aids in
enabling a female soldier by understanding the challenge they have to
face and being supportive. Using the male name, referring to the person
as “he”, commenting constructively on appearance and demeanor, and
helping perfect drill go a long way in making a soldier feel comfortable
and enhances the atmosphere of being “one of the guys”, which is, after
all, one of the major points of becoming a soldier.
Pick a personality for
your man. Perhaps you are boisterous, shy, or chivalrous. Perhaps you
like to chew, smoke (pipe or cigar, cigarettes were very French and
feminine) spit, drink, or cuss (not around children and ladies,
hopefully) Perhaps you like cards, or are a gentleman. Maybe you are a
boy yet, and not sure of your manly identity. Take care to escort
ladies. Remember complaining about men when you were a lady? Now you can
rectify the situation!
Strategic wounds.
Imitating a head wound may seem like an easy way to disguise female
hair, but take care. You don’t want to be the only wounded man in the
ranks; it would just single you out. You also don’t want to be
unrealistic. A man with a head wound doesn’t usually operate up to
snuff; staggering around the battlefield is a sure way to obtain real
injuries. Plus, has your unit just come off the field? In a two-day
battle, it is probable that many men in the unit would have suffered
minor injuries, been “fixed up” and then returned to the front lines. If
you are green troops seeing your first battle, you all are probably the
picture of health. Plus, extra layers on the head equals increased risk
of heat stroke. I would only use this disguise as a last resort.
Dying. By observing the actions of others, you can come to your own conclusion about the best way to “take a hit”. A
good way to die for the female is to die face down. Besides preventing
sun burn to the face, it protects you from marauding surgeons who want
to do chest examinations, you can better cover your head if troops are
passing over, or firing over you, and it removes your tell-tale face
from spectator view. Be sure to keep that head down, though, and resist
the temptation to peek at the battle. Watch the barrel of your rifle and
make sure you aren’t missing any piece of your kit. Avoiding screaming
when doing this is also best, as it is incredibly hard to scream like a
man. So too, avoiding much cheering and “rebel yelling” during the
battle is also probably a good thing to prevent your detection. Besides,
if you are a young boy, you are most likely scared out of your wits and
cheering for blood is probably the last thing you are thinking about
doing.
The call of nature.
Obviously, you want to avoid answering this when out on the campaign
trail, unless you are absolutely out of vision of other soldiers. In the
1860’s, such a mannerism would earn you notoriety as a modest man and
was considered usual behavior. Today, men see little reason to hide
their natural functions from other men. Often, fellow men will feel the
need to relieve themselves and may not do so out of sight. This should
not offend you, and if it does, perhaps you should reconsider your
military career. Simply avert, or close your eyes until it is safe.
Pretending to be completely oblivious and paying attention to something
else is also a good way to deal with this. If you make a fuss, you will
reveal yourself. Just be cool, and deal with it!
In camp. Thinking of your
unit as a flock of sheep, follow the crowd, go with the flow. You will
likely have a corps of buddies you prefer to hang out with. Go to the
sutlers with them, sit around the fire (in a manly fashion of course) or
repose in a shady spot. If you are feeling dapper, go on a picnic with
the ladies and be the perfect gentleman. Always wear your hat and vest.
Don’t be a grouch and hide in your tent! Help out with meals and camp
duties. Giggling, smiling and flirting are feminine characteristics to
be avoided at all times! Don’t send mixed signals! I challenge you to
maintain your male character while on stage, and that means the whole
event! It is difficult, to be sure, but think of the spectators, you
don’t want to be detected. Think of the guys, you can’t let them down.
Don’t embarrass yourself by letting a giggle escape or by gesturing in a
feminine way while talking. Don’t squeak or sigh, truly girly actions.
The dance. Many female
soldiers choose to revert to their original sexes for the evening dance.
Be sure this is ok with your commanding officer. You may be female for
the dance only. The next morning, you are expected to report for roll as
usual. I am always amazed by how few women I see during the day and how
many I see during the evening! If you attend the dance as a man, woe be
to you! Men have hard times finding partners (though all they have to
do is ask!) and I have mentioned before the hardship they find in
dancing. If you are a good dancer, that itself may give you away. It is
hard to observe an example of a good male dancer to emulate, but if you
do happen to find one, dancing in his group is the most advantageous to
observing him. Again, no giggling, and not much smiling. Do wear gloves.
Besides being proper for a gentleman, white gloves make the hands
appear larger and therefore more masculine.
Pregnancy. If you are
pregnant, I question that you should even be on the field subjecting
yourself to such strenuous conditions, but your doctor can best make
that determination. Though the original female soldiers did have to deal
with this condition, (some were, remarkably, not detected until the
moment of birth!) it is not so simple to pass for a pot-bellied male. In
a war where troops of neither side were very well fed (by today’s
standards) a rotund soldier was rare indeed! Plus, one would presume
that someone had detected the female in the ranks, or she would
not be in such a state! Given the probability that some injury could
happen to you and thus, your unborn, while in action, be a good mother
and a bad soldier, stay off the field!
Opposition. Please
understand that there will always be some men out there who just do not
think that women should be standing next to them on a battlefield. This
is just a fact. Not every guy knows that we can document cases of real
women fighting in this war. Not every guy feels it is ok for women to be
in uniform now. That’s just the way it is. You cannot make everybody
happy, but you can take great pains to disguise your feminine traits,
learn your drill, and assume a good male impression. There may be some
instances where you are detected, as men are more keen on looking for
females in the ranks now than they were in 1861, but do the best you
can, and you will gain supporters from men who do feel that women can be
out there. Honor our ancestors, male and female, who fought in this
bloody conflict, and perhaps a new generation will be better informed
about the history of their country.
In summary, this
takes a lot of work and preparation. A great deal of thought and a
little theatrics can help you to succeed in the ranks. But it is
extremely difficult, perhaps the most difficult impression, and
you may encounter opposition, especially in other men on the field. Do
your best, learn as much as you can, and, if in the end you find it
isn’t for you, at least you tried it and had a different experience!
Good luck to you!
~Pvt Pete MacRae
21st Georgia Volunteer Infantry
The Sewing Box
Well, it’s finally here!! A sewing box I can leave out for the public to see and not have to hide it or it’s contents away!
Let’s see what’s inside!
Anna Worden has been kind enough to
publish the original in an issue of the Citizen’s Companion sometime
ago. I pulled it out to re-make, little knowing she’s going to soon
publish detailed instructions on how to make it!
So I can’t reveal that part, but you can see
the pocket for scissors, pages of wool flannel for needles, a
wool-filled cushion for the pins and the box housing the measuring tape,
thimble, chalk, notebook and pencil (for making lists of things that I
need to sew of course!) seam ripper, enameled case for buttons and
hooks, beeswax, and thread. I also added a ruler case since I always
find I need to be making tucks or measuring knitting when in the field.
I got a chance to use up some silk and wool
scraps and show off my feather stitching. This weekend, I purchased horn
thread winders and a steel seam ripper (which is way better than those
poky modern things!) to complete the kit. The buttonhole punch was very
tempting, but a bit more expensive than I could afford!
You can see it’s very easy to tuck in the bag when traveling!
I’ve hardly ever needed a sewing kit when
doing Civil War, but when trying a different era I used it ALL the TIME!
So don’t leave home without it!
Look soon for published instructions on how to make your own as well as a nifty rolled-up housewife for your soldier!


No comments:
Post a Comment